The documentation set for this product strives to use bias-free language. For the purposes of this documentation set, bias-free is defined as language that does not imply discrimination based on age, disability, gender, racial identity, ethnic identity, sexual orientation, socioeconomic status, and intersectionality. Exceptions may be present in the documentation due to language that is hardcoded in the user interfaces of the product software, language used based on RFP documentation, or language that is used by a referenced third-party product. Learn more about how Cisco is using Inclusive Language.
This article provides instructions on how to use the Port to Virtual Local Area Network (VLAN) page in the web-based utility to display and configure the ports within a specific VLAN in a Cisco Business 350 series switch.
A Virtual Local Area Network (VLAN) allows you to logically segment a Local Area Network (LAN) into different broadcast domains. In scenarios where sensitive data may be broadcast on a network, VLANs can be created to enhance security by designating a broadcast to a specific VLAN. Only users that belong to a VLAN are able to access and manipulate the data on that VLAN. VLANs can also be used to enhance performance by reducing the need to send broadcasts and multicasts to unnecessary destinations.
To forward the packets properly, intermediate VLAN-aware devices that carry VLAN traffic along the path between end nodes must either be manually configured or must dynamically learn the VLANs and their port memberships from Generic VLAN Registration Protocol (GVRP).
Untagged port membership between two VLAN-aware devices with no intervening VLAN-aware devices must be on the same VLAN. In other words, the Port VLAN ID (PVID) on the ports between the two devices must be the same if the ports are to send and receive untagged packets to and from the VLAN. Otherwise, traffic might leak from one VLAN to another.
Frames that are VLAN-tagged can pass through other network devices that are VLAN-aware or VLAN-unaware. If a destination end node is VLAN-unaware, but is to receive traffic from a VLAN, then the last VLAN-aware device (if there is one), must send frames of the destination VLAN to the end node untagged.
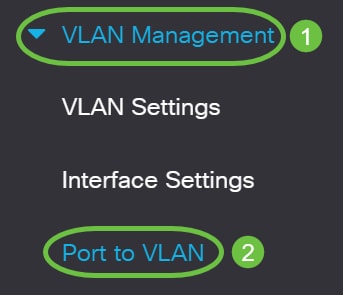
Step 1. Log in to the web-based utility and chooseVLAN Management > Port to VLAN.
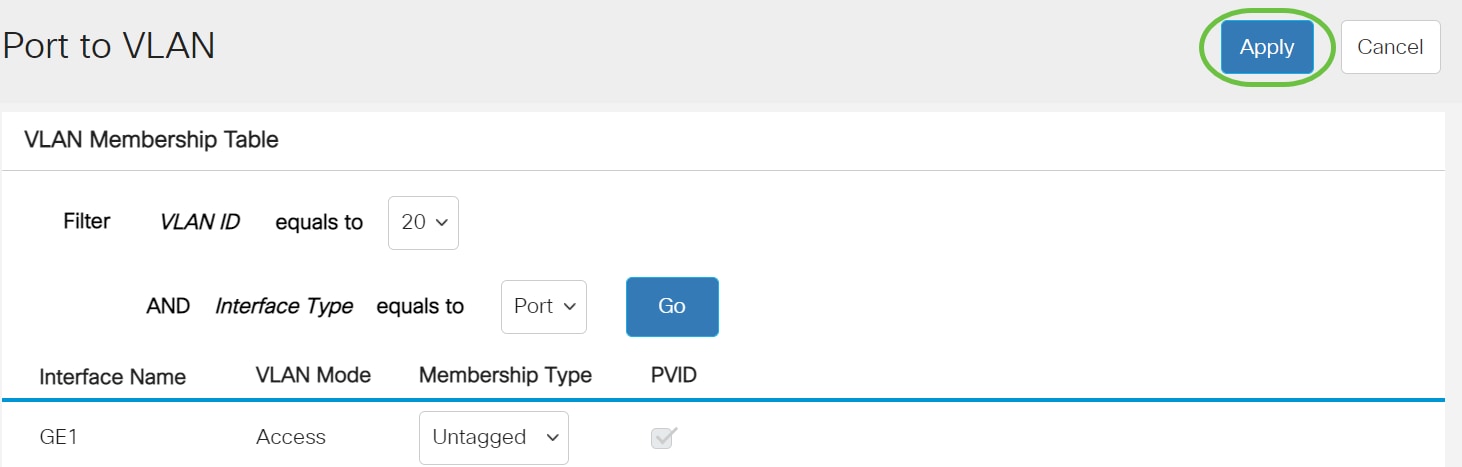
Step 2. Choose a VLAN ID from the Filter VLAN ID equals to drop-down list.
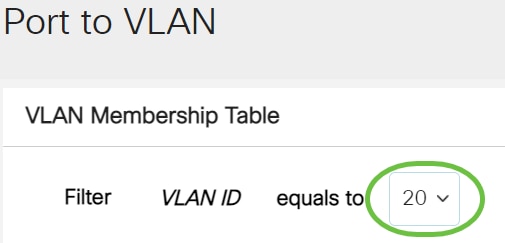
Note: In this example, VLAN20 is chosen.
Step 3. Choose a Port or Link Aggregation (LAG) from the Interface Type equals to drop-down list then click Go.
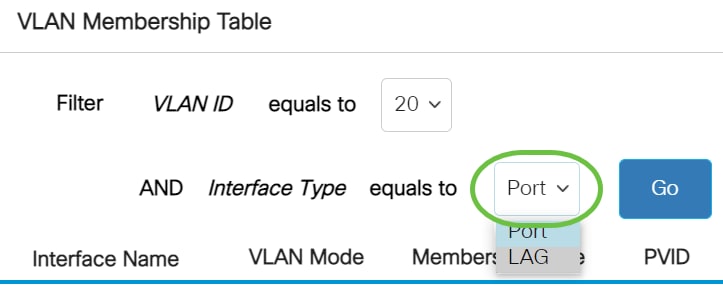
Note: In this example, Port is chosen.
The port mode for each port or LAG appears with its current port mode (Access or Trunk) configured from the Interface Settings page. Each port or LAG appears with its current registration to the VLAN.
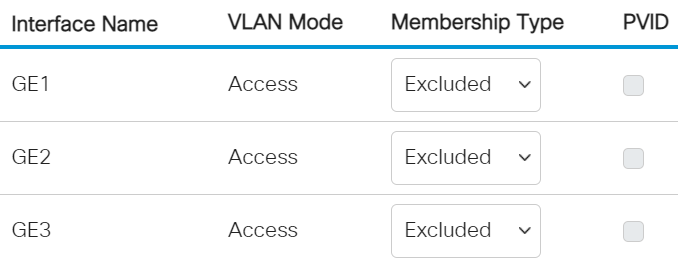
Step 4. Choose an interface to change the registration of an interface to the VLAN then choose a Membership Type from the drop-down list.
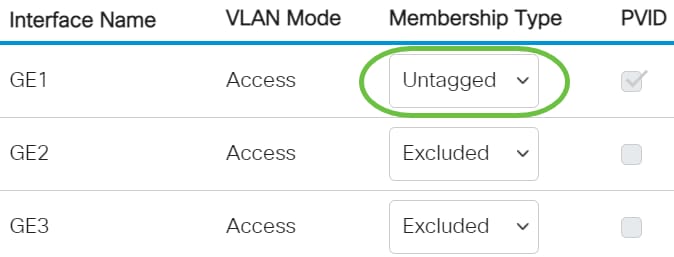
The options are:
Note: In this example, GE1 interface is changed to Untagged.
Step 5. Click Apply. The interface is assigned to the VLAN and saved in running configuration file.
Step 6. (Optional) Repeat Steps 2 to 5 to configure port membership of another VLAN by choosing another VLAN ID.
Step 7. (Optional) Click Save to save settings to the startup configuration file.
You have now configured the ports within a specific VLAN in a Cisco Business 350 series switch.
Looking for more information on VLANs for your Cisco Business Switches? Check out any of the following links for more information.